
At Acolad Community, we are committed to giving you insightful information about new technologies to help you work more efficiently and expand your skills, especially regarding CAT Tools. In our previous article, Acolad’s Project Managers gave you useful tips to begin with Memsource’s basic features, such as accept a project, set up filters and import translation memories and term bases.
Today, in part 2 of our tips for mastering Memsource, let’s go further and discover some of the features that will help you edit files when your profile is set up as “LINGUIST”. We’ll look at how to deal with spellcheck options, editing a term base and doing an alignment.
Project management in Memsource: spelling and filter options
In part 1, we showed you how to run a QA checker in Memsource. Here, we will focus on how to access spellcheck options beforehand:
Displaying the spellcheck options in Memsource
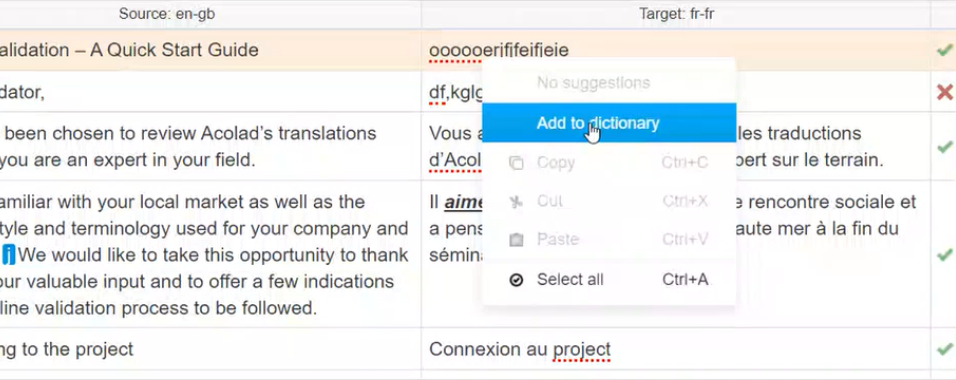
In the editor, you may see some words underlined with a dotted red line. This happens when Memsource thinks it is a typo or a spelling problem.
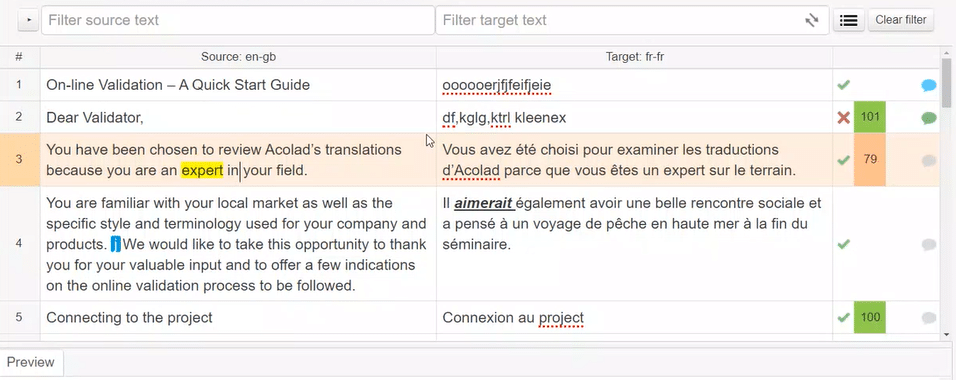
In order to access the spelling suggestions, you can right click to display spelling suggestions and “Add to dictionary”.
You can also cut, copy and paste (keyboard shortcuts: Ctrl + X, C or V) in the source or target segment, or right click and select between the three options.
Displaying the filters option in Memsource
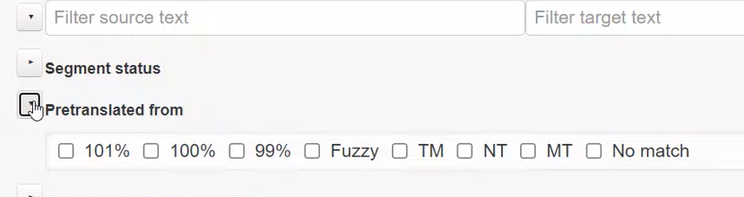
If you click on the drop-down menu at the left of the “Filter source text” box, you can see a Pretranslated from filter, that helps you sort segments by different types of matches. You can even filter by segments that are from a translation memory or done via machine translation.
Don’t forget to click on Clear filter at the right side of the “Filter target text” box to get rid of all activated filters.
Finding the replace filter in Memsource
To find this filter quickly, use the following keyboard shortcut Ctrl + H. This will display a little box right under the Filter target text box:
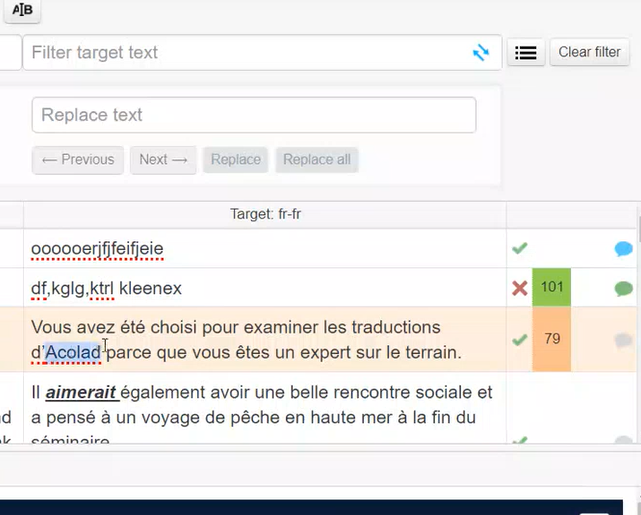
You can either navigate between the Previous and Next term, type and click on Replace, or select Replace all if you need to change one term throughout the file.
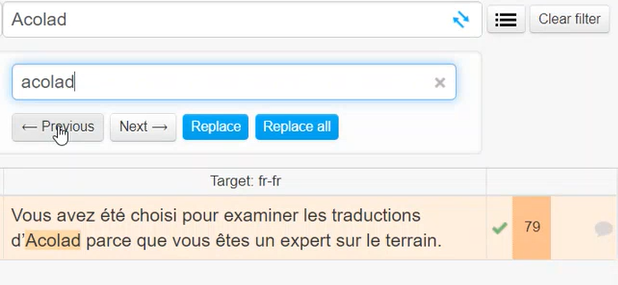
Click on Clear filter or do Ctrl + H to get out of the replace filter.
Editing the Term base in Memsource
Note: As “LINGUIST”, you cannot access a term base (or a translation memory) on its own. You have to be inside a project or have part of the workflow assigned to you in order to actually access the term base (You automatically have access when you are given access to a project).
So, if you are asked in Memsource to do an update of the term base (different from importing a term base), then what you need to do would be to ask the Project manager to assign you part of the workflow for integrating a modification (or similar action, depending on the project), and that way you’ll have access to the term base.
Adding a term to the term base in Memsource
When a new term is found by the term base, it’s highlighted in yellow and term base options are always shown in the CAT pane at the same time as the translation memory.
If you want to add a term, there are various ways that you can do it.
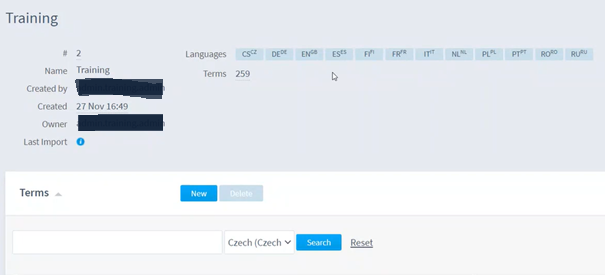
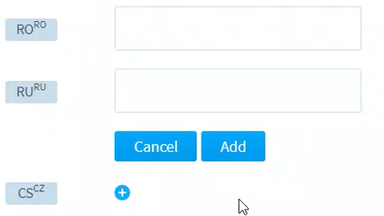
The first option is to go to the dashboard page, scroll down in the project page that you’re in until Term bases, and simply click on the name of the term base. You can then see the languages that the term base is in and the number of terms.
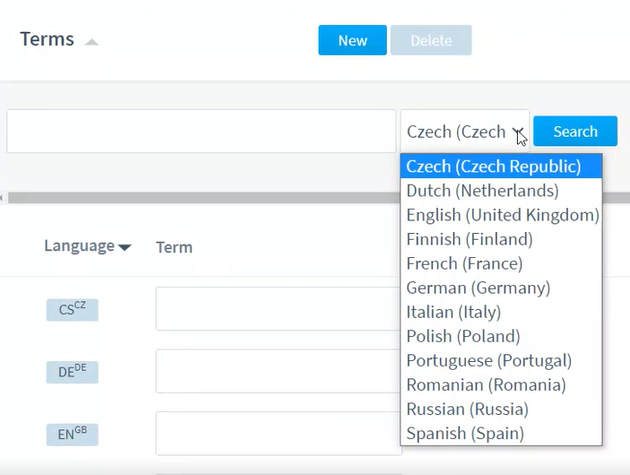
You can click on “New” to add a new term, then select your language below (here in the example in Czech) and click on “Add” (otherwise it won’t be saved).
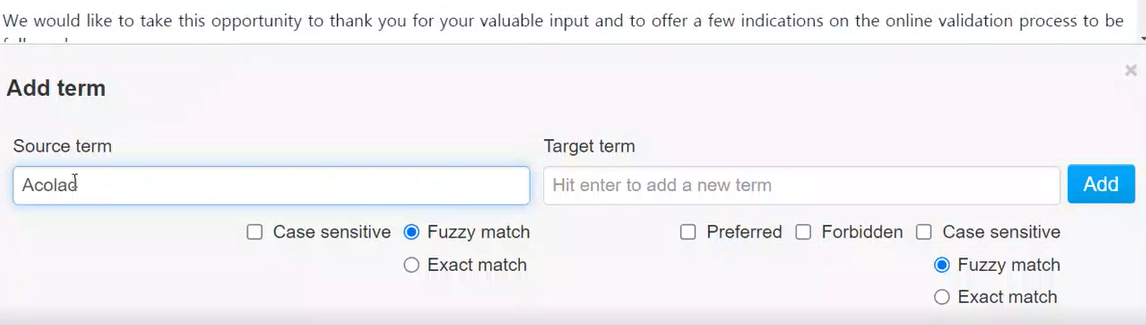
The second way is from the editor view itself: you can simply press Alt + T to bring up this window at the bottom of the editor pane.
The source term is already added in the Source term box, you just have to add the Target term. You can decide if it’s case sensitive (which could be helpful for proper nouns, client names, product names and acronyms for example).
In the source term part, you can also decide whether it’s a fuzzy match or an exact match, in other words to decide if you want to search the exact term, or if you want to search for the fuzzy match version of the term.
In the target term part, you can say whether it’s a Preferred term or a Forbidden term, case sensitive, and a fuzzy or exact match when it’s added to the term base.
Once you’ve selected all desired options, click on Add. Once it’s added, it comes up straight in the CAT pane in real time. If it’s highlighted in red and crossed through, it means that the term in the target text is a forbidden term, and therefore when you do a QA check at the end, it will be shown as an error in the QA checker.

Editing a term in the term base in Memsource
As for adding a term, there are a couple of ways to do it.
The first option is in the term base dashboard view: select the language of the term that you want to search for, select the term and the following options come up:
- Erase by clicking on the red cross,
- Adding other terms by clicking on the little blue + sign
You can also simply click on the term itself and land on this editing pane for the word:
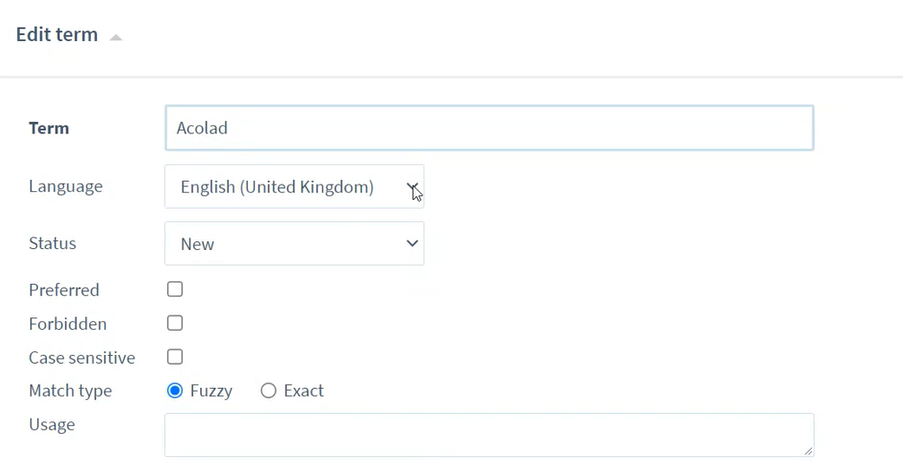
You can edit the status (New or Approved), set up as a Preferred, Forbidden or Case sensitive term, choose the match type and modify other parameters, such as gender, number, term type, domain, subdomain, etc.
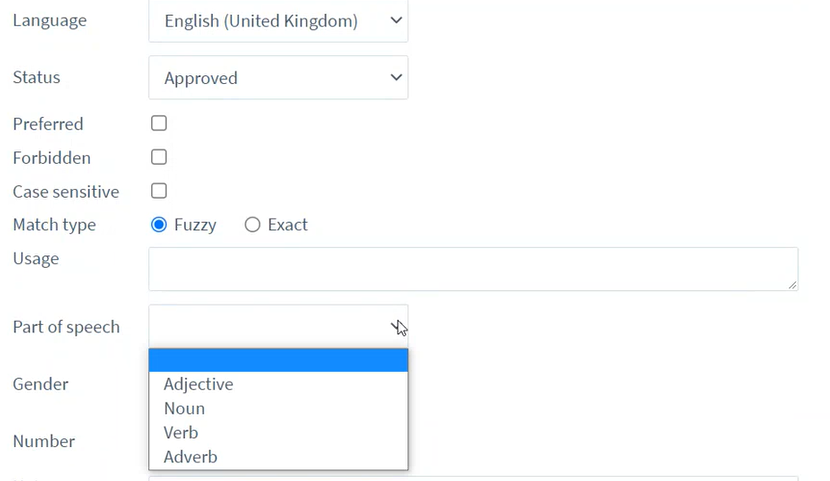
Don’t forget to press “Save” when you have finished editing the term so as not to lose your work.
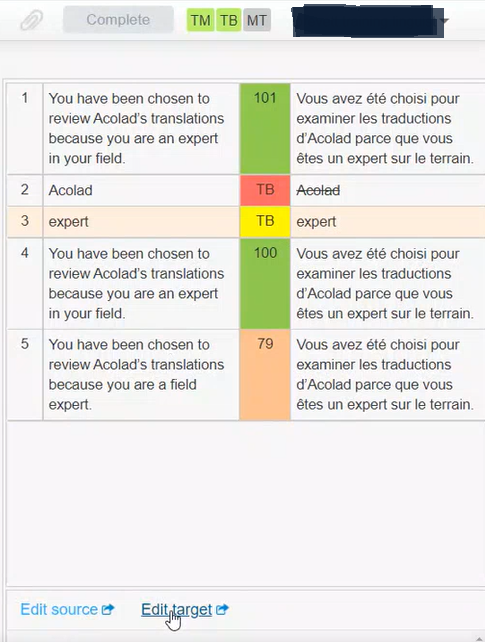
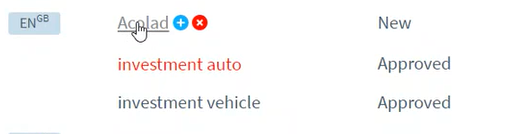
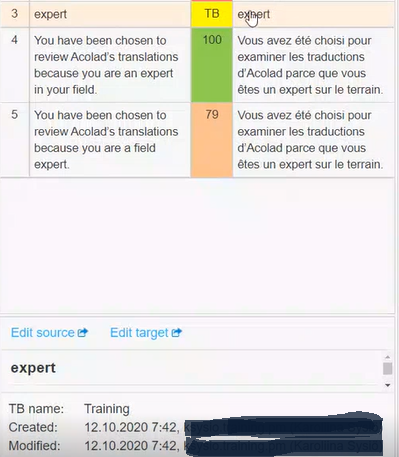
The second option is inside the main editor pages of Memsource. If you click on the line in the CAT pane, it brings up Edit source and Edit target below (for example with “expert” below). You also have details of which term base it is from, when the term was created and when it was last modified. When clicking on either Edit source or Edit target, it brings you to the editing pane shown in the first option.
Preparing an import content into a term base in Memsource
The easiest way for preparing a glossary to turn into a term base in Memsource is to use Excel, just like for many other CAT tools.
First of all, make sure you have the language names at the top of your columns.
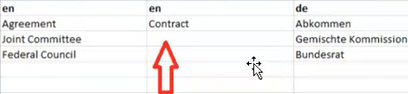
As when preparing glossaries for other CAT tools, start by adding your terms in the languages that you need. You need to have a separate column next to each other for each language.
If you have synonyms of a term to add in Memsource, you can’t put the pipe symbol for synonyms. You need to add a separate column for the language of the synonym you would like to add. Simply add the column right next to the corresponding language.
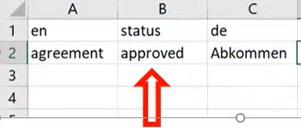
Another thing to know is about the status of a term. For example, if you want to upload automatically terms that have been approved by the client, then keep your columns and add another column for status and label the term as “approved”. When you import the glossary into Memsource, it will automatically upload the information that this specific term is approved.
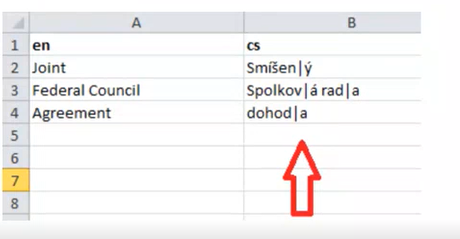
For some languages with declensions (plural, feminine, genitive, dative, etc.) and various endings, use the Pipe symbol “|” and put the options after the word.
As “LINGUIST”, you can’t upload or import anything into a project or a translation memory or term base because of the access rights that are set up for linguists inside the software, for security purposes.
You can work on the term base directly inside Memsource, but if you want to import a term base, or import your changes into the existing term base, you need to ask the Project Manager and send over the excel file, as the Project Manager is able to enter the project and make modifications directly.
This is the same for editing translation memories: only the Project Manager can access them directly. You can search and delete a segment, but you cannot make any modifications. Editing has to be done outside the Memsource linguist interface and by the Project manager.
Working on alignment in Memsource
There are various ways to perform an alignment with Memsource.
The process is similar to accessing the translation memories, because the system deems that a LINGUIST doesn’t need to be able to import/export into a translation memory. Notice that the interface, and therefore options to edit are different, depending on whether you open the files as a project manager or a linguist. Inside the linguist view, you only have the ability to consult the translation memory.
If you want to do an alignment directly inside Memsource, without using any kind of CAT tool, you need to ask the Project Manager to create a task in the work flow for you. The Project Manager will then be able to select either multiple documents or a single pair of documents and upload the files (either multiple files and zip files or the individual file if you’re aligning a pair of documents). An Excel sheet is prepared after hitting the “alignment” button.
You have two columns corresponding to the source and target segments, but beside them there will also be a column with the name of the client and the document, so that you know which file you are working on if you have multiple files.

Be careful, as the Excel sheet breaks up the segmentation. This can be an issue if your document has a format with a lot of spaces (for example a PowerPoint) because some segments could be missing in the target segments. Here, you need to correct the segmentation yourself by editing the segmentation matches.
When you’ve finished editing the Excel, save it and send it to the Project Manager.
Another way of doing an alignment in Memsource as linguist is to ask for the translation memory to be exported in a format that can be used with an alignment tool (for example WinAlign or the Alignment in Studio).
One useful tip is to create a translation memory specific to your alignment, because once you’re working directly by importing your modifications back into the TM, it will literally delete the segments. If you make a mistake on a segment, this will be gone forever once it’s been reimported. So, remember to create a separate translation memory just to work on the alignment and update it safely.
Now you know how to make the best of all the essential Memsource features! In another article, to come soon, we will talk about how to use MemoQ.
If you have any other questions or tips on Memsource, feel free to share them in the discussion group!